Content:
MainExamples from CIT160 book
Any suggestions?
Under construction! Thank you for your patience!
I built this page for one of my classes (CIT 160). We are learning C during the first half of the semester and I figured I'd put a good portion of my knowledge up here so maybe I might be able to help my classmates a little bit.
I run through quite a bit of a C, but this is in no way, shape, or form an all-inclusive tutorial of the C language.
Content:
MainEvery program that you will ever write in C will have a main function. Some main functions will be as simple as one line: calling another function. Some will be more complicated, composed of all the code for the entire program. A basic main looks similar to this:
int main(void) {

              return 0;

            }
The return 0; is the value the main function will return (more on functions later). Zero is normally a successful return value, whereas any other value is some form of error code. void is a special type that specifies nothing (more on that in the variables section). In the snippet above, void specifies that nothing is being passed in to the function from the terminal. This is actually redundant; I can just leave the parentheses empty and it would mean the same thing. If the above code snippet were to be compiled and run, nothing would happen. The program would execute, then immediately terminate with a successful state.
Main can also have parameters passed in from the console upon runtime. There are two variables that you can receive in main: int argc and char **argv. The variable int argc counts the number of arguments passed in to the program from the command line. Variable char **argv holds the arguments passed in from the command line. For example, in the source code below, I pull in three variables from the command line.
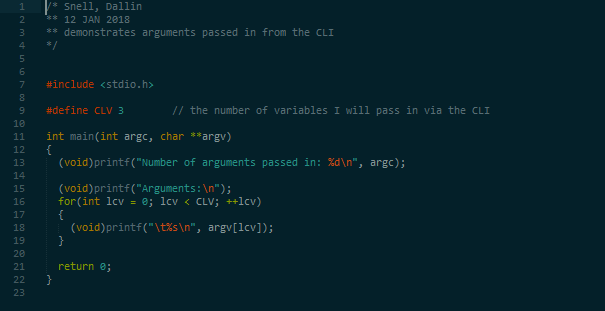
In the next figure, I actually run the program. The first variable passed in to the program is always the program's name. The second and third variables are the ones that appear after the program name on the command line (i.e. "Kali" and "Linux").

Variables are containers for data. There are a number of variable types in C: int, char, float, double, and void. In addition, there are a few designators that change the way these types operate: unsigned, short, long, and signed. Variable names, themselves, must follow specific conventions in order to be recognized by the C compiler. Variable names must begin with an underscore ("_") or letter (uppercase or lowercase).
Even though the other sections are still slightly incomplete, I figured I'd throw in the examples we should have already read in the book.
Fellow students! In order to maintain the integrity of this course, please attempt the examples from the book yourself before coming here. I've included the source code in an easy-to-download manner. Please have the integrity Brother Barney expects of us.
The first example is a simple function. With a few additions of my own (which differ slightly from the book), here is the source code for the first example.
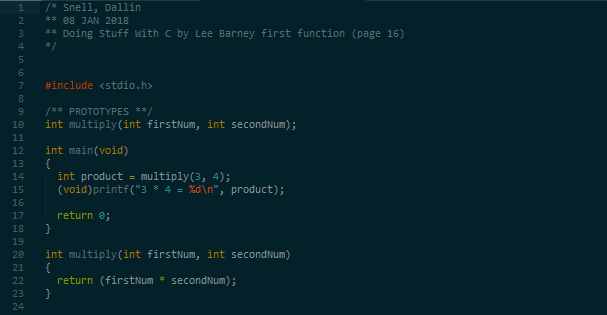
On line twelve, you notice the beginning of main. Main doesn't return until line seventeen. On line seven, I include a library--called standard i/o. Line nine begins what is called the prototypes. Line twenty begins the function prototyped by line ten. Line fourteen is both a variable declaration (see Variables) and an assignment. Line fifteen is a call to a function that prints to the console (see Print to Console). Notice on line twelve (the opening line of main) I put void in paratheses after the declaration of main. This is redundant (the paratheses can be empty), but lets both me and future readers of my code know that I meant for nothing to be passed into main. (See Main for a better description of passing parameters into main.)
Below, I have binaries for both a Cygwin system on Windows and a Unix system. The following screenshots show both binaries in action.


If you would like to download this source code, here is the link.
The binary for a Cygwin system on Windows can be found here (built on Windows 10).
The binary for a Unix system (i.e. Linux or Mac OS) can be found here (built on Kali Linux 3.20.2).
The second example, was how to receive input from the user. The source is found below.
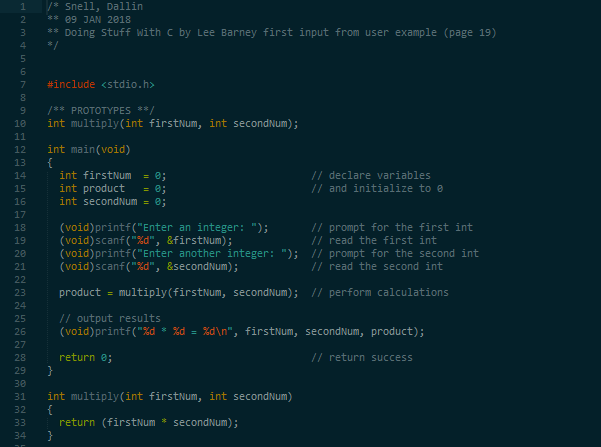
Similar to the first example, main begins on line twelve. Variables are declared on lines fourteen through sixteen. On line eighteen is when the example's purpose really starts. Lines eighteen and twenty both prompt the user for an integer. Lines nineteen and twenty-one receive input from the user. The function scanf() takes two parameters (for this example). The first parameter tells the function what is being read (in this case, an integer is being read); the second parameter is the variable where it will be saved. From there, we can perform the calculations we performed in the first example. A difference in outputting the results from the first example is on line twenty-six: we have to output what the user has entered as well as the result. Thus, we now have three variables being output instead of one.
Here are the screenshots for the binaries being run:


If you would like to download this source code, here is the link.
The binary for a Cygwin system on Windows can be found here (built on Windows 10).
The binary for a Unix system (i.e. Linux or Mac OS) can be found here (built on Kali Linux 3.20.2).
The next example demonstrates how to save data received from the user to a file. The source is found below.
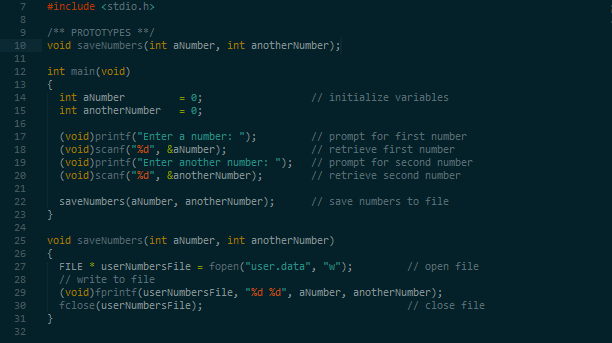
main most just has stuff that we've already seen before--printing to the console, receiving input from the user, declaring variables, calling functions/procedures, etc. The interesting stuff--and what this example looks at--occurs starting on line twenty-seven. On this line, we declare what is called a file pointer. This does nothing more than point to a file that we have stored in memory (but is currently empty). Immediately, we call a function (fopen()) that returns an actual pointer to a file we have created. Here, fopen() takes two variables. The first is the name of the file. The second is the file access mode. The access mode can be one of six options: r, w, a, r+, w+, and a+. I go further in depth to these options here. Suffice it to say here that the option w opens a new file to write to. Line twenty-nine uses fprintf() to write to the file. The first variable here is the file pointer we defined on line twenty-seven. The next variable is the text to be stored; in this case, we specify two numbers. Those numbers are given as variables three and four. Line thirty closes the file (more info on closing files here).
Here are the screenshots for the binaries being run:
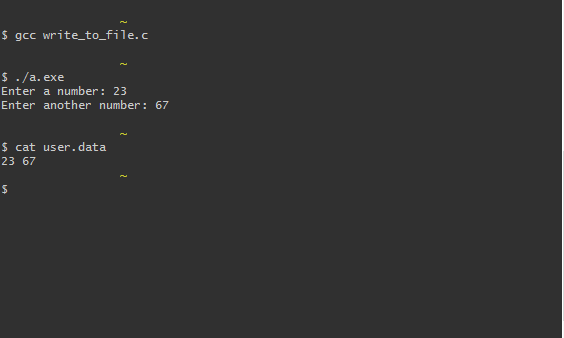
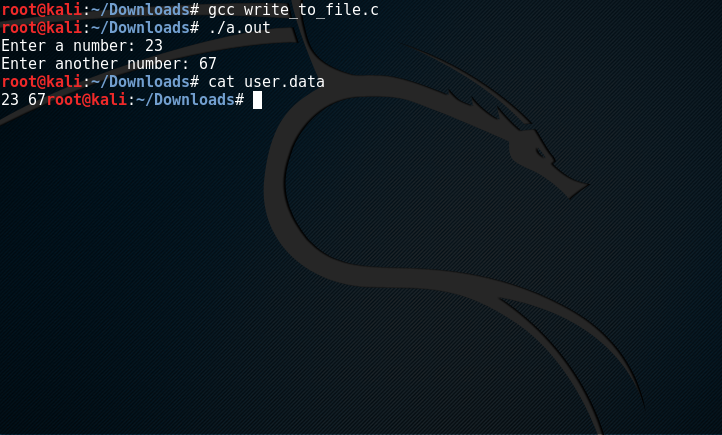
If you would like to download this source code, here is the link.
The binary for a Cygwin system on Windows can be found here (built on Windows 10).
The binary for a Unix system (i.e. Linux or Mac OS) can be found here (built on Kali Linux 3.20.2).
An associated example with the previous one demonstrates how to read data from a file. The source is found below.
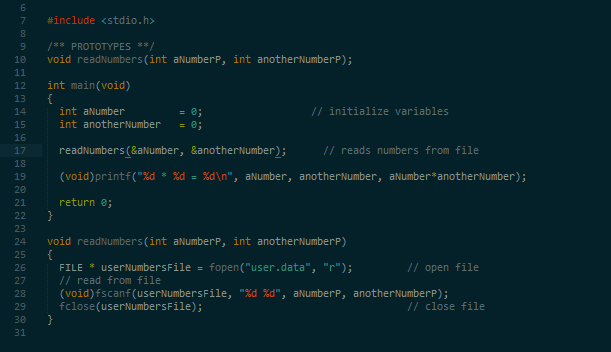
main just prints the numbers we receive from the file. The magic happens on line
Here are the screenshots for the binaries being run:
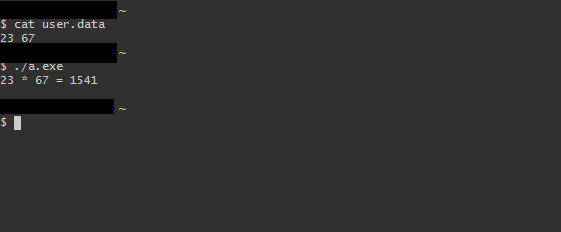

If you would like to download this source code, here is the link.
The binary for a Cygwin system on Windows can be found here (built on Windows 10).
The binary for a Unix system (i.e. Linux or Mac OS) can be found here (built on Kali Linux 3.20.2).
Everyday we have to make choices. Computers are not different. They have to be able to make a choice between two or more options. In coding, this is called a conditional. The source is found below.
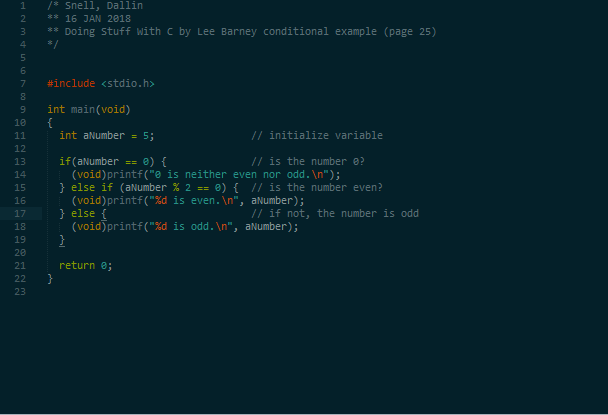
Again, I felt main could hold all the code. Line thirteen starts off the conditional. It compares aNumber (defined on line eleven) to zero. If the number is zero, we know it can't be either even or odd. Line fifteen says that if the number is not zero, but aNumber mod two is equal to zero (meaning can the number be evenly divided by two), then print it is even. If the line thirteen and line fifteen both are not true, then line eighteen will print that the number is odd (the only option remaining).
Here are the screenshots for the binaries being run:
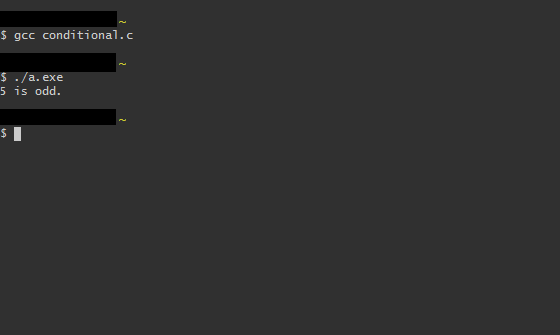

If you would like to download this source code, here is the link.
The binary for a Cygwin system on Windows can be found here (built on Windows 10).
The binary for a Unix system (i.e. Linux or Mac OS) can be found here (built on Kali Linux 3.20.2).
Starting on page thirty, the book starts to talk about the for loop. The source is found below.
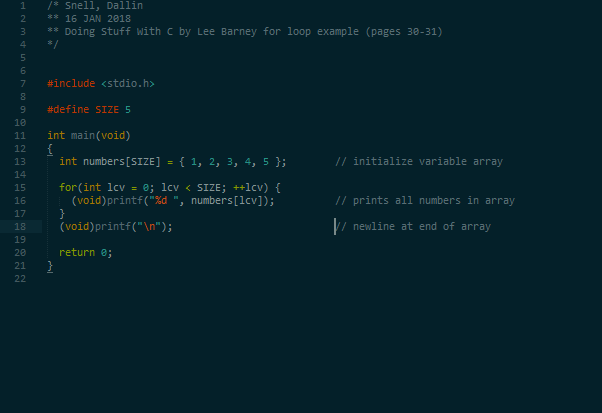
Line thirteen defines an array variable. This array holds five numbers (for more information on arrays, go here). Line fifteen begins the for loop. int lcv = 0; initializes the loop control variable; lcv < SIZE uses a constant I made (on line nine) to tell the loop when to stop; ++lcv tells the loop that everytime I reach the end of the loop to increment lcv by one. This particular program prints the array out on one line.
Here are the screenshots for the binaries being run:
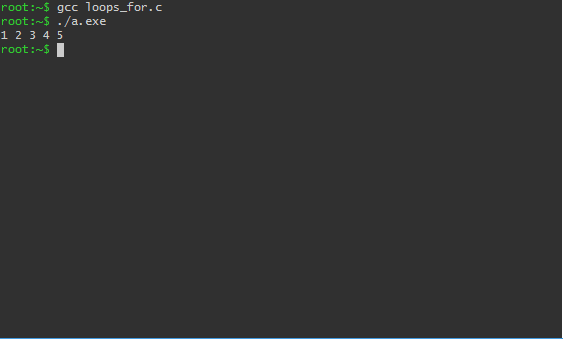

If you would like to download this source code, here is the link.
The binary for a Cygwin system on Windows can be found here (built on Windows 10).
The binary for a Unix system (i.e. Linux or Mac OS) can be found here (built on Kali Linux 3.20.2).
Page thirty-two begins the explaination of a while loop. The source is found below.
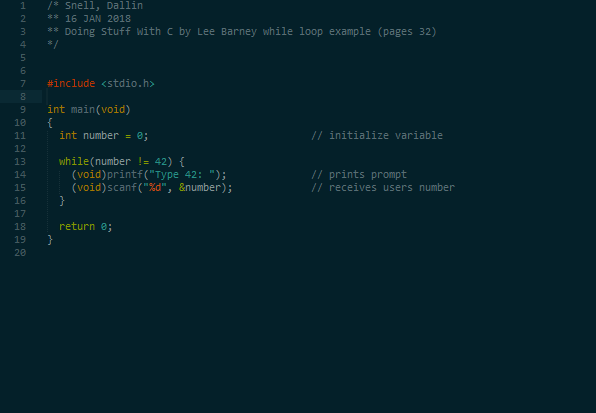
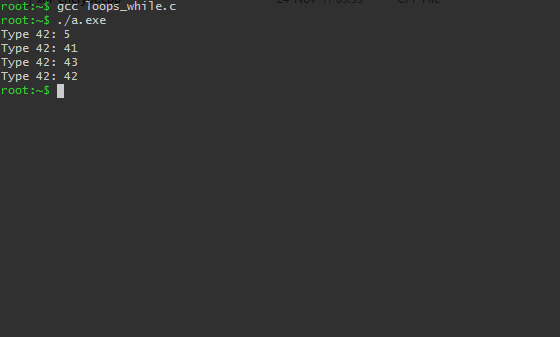
A while loop does what a for loop does, just slightly different. A while loop goes until a given condition becomes true (as does a for loop), but does not have a built-in counter. This example will continue to prompt the user for the number "42" until they enter that number.
Here are the screenshots for the binaries being run:

If you would like to download this source code, here is the link.
The binary for a Cygwin system on Windows can be found here (built on Windows 10).
The binary for a Unix system (i.e. Linux or Mac OS) can be found here (built on Kali Linux 3.20.2).
A struct is a way of aggregating a collection of elements. The source is found below.
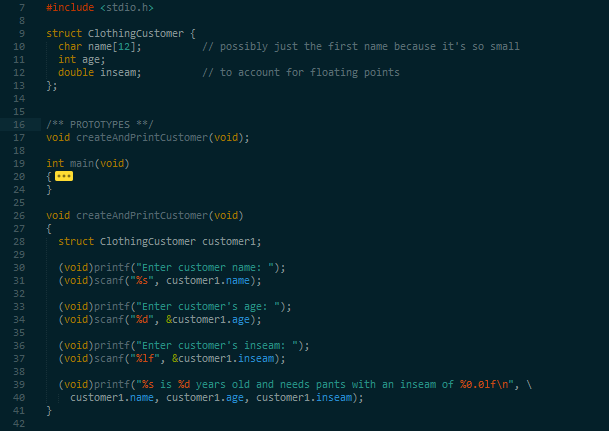
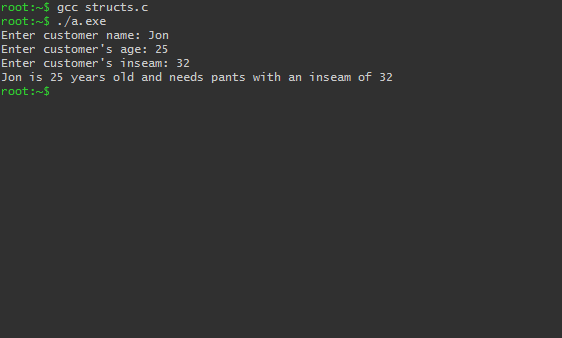
As I mentioned earlier, a structure (or struct) is a collection of elements that is referenced by what is known as the dot operator (seriously just a period). You can define any variable type within the structure and any number of variables (although once you get to a certain number your program's load time will increase). Once your structure has been defined (as seen on lines nine through thirteen) you can "create" a variable of your structure type (see line twenty-eight). You then access the elements inside the structure through the dot operator (as on lines thirty-one, thirty-four, thirty-seven, and forty). Note that the example shows that the dot operator works for both input and output to a structure. I added my own formatting to the output on the inseam. For a greater description of this, see here.
Here are the screenshots for the binaries being run:

If you would like to download this source code, here is the link.
The binary for a Cygwin system on Windows can be found here (built on Windows 10).
The binary for a Unix system (i.e. Linux or Mac OS) can be found here (built on Kali Linux 3.20.2).
Prototypes are a declaration of a function before the function is actually "fleshed out". If a prototype is not present, all functions must be declared before main.
Under construction! Thank you for your patience!